Setup real-time source localization example
From MNE-CPP Wiki
Revision as of 17:26, 19 September 2016 by LorenzE (Talk | contribs) (Created page with "This tutorial will show how you can setup an acquisition and processing chain in MNE Scan, which makes use of the real-time source localization. # Make sure you downloaded an...")
This tutorial will show how you can setup an acquisition and processing chain in MNE Scan, which makes use of the real-time source localization.
- Make sure you downloaded and correctly extracted the MNE Sample data set. If not, check for a step by step guide here.
- Start mne_rt_server in your mne-cpp/bin folder
- Start mne_scan in your mne-cpp/bin folder
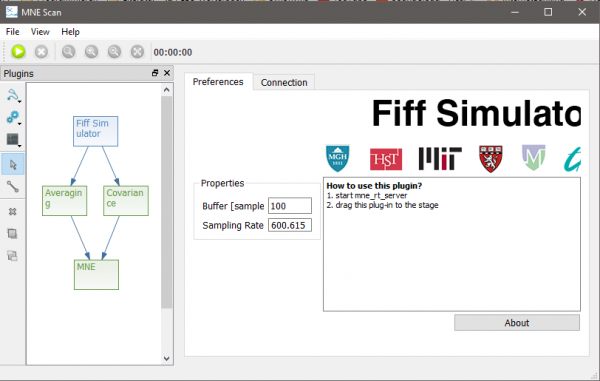
- Navigate to the Sensor Plugins and Algorithm Plugins buttons in the plugin window. Select and position the following plugins onto the plugin scene:
- Sensor Plugins - FiffSimulator
- Algorithm Plugins - Averaging
- Algorithm Plugins - Covariance
- Algorithm Plugins - MNE
- Select the Connection tool in the plugin window. Connect the plugins as follows by left clicking on the start, holding and releasing above the target plugin.
- Click on the MNE plugin and wait until the Start Clustering button is clickable again
- Start the pipeline by clicking on the green play button in the left upper corner
